About a week and a half ago, a very sweet stray kitty saw the giant "SUCKER" written on my forehead in ink only visible to animals, and latched on.
A few problems, though: 1) We already have two cats, one of whom has severe vaccine reactions and cannot be vaccinated, so little kitty can't come in our house with her possible diseases. 2) Every no-kill shelter in the area--every single one--is buried in cats. 3) It's very, very cold outside. And...
4) I have a sneaking suspicion she's pregnant.
Right now, she's been living under our deck, and she seems fairly comfortable and warm there. However, with temperatures going down into the teens this weekend, my husband and I wanted her to have another option. Seizing opportunity, this is how you build an insulated cat box for around $20:
Step One: Bins

Sadly, I didn't have any of these lying around, but these two were fairly cheap at Kmart; the two together were only $17. If you're really hard up on cash, though, you can achieve a similar result with two cardboard boxes, wrapped with a garbage bag for water resistance. The requirements are that one must nest comfortably inside the other with both lids on and closed. Make sure there's a little wiggle room; remember, we'll be adding insulation.
Step Two: You cut a hole in that box


Both boxes, actually. This is the most labor-intensive and frustrating step. I suggest scoring the cut lines several times with an Exacto knife, punching through, and then using a serrated kitchen knife to actually cut through the plastic. Be patient, young Padawan, or you're going to crack the shit out of those bins and make them unusable. The openings should be cut so they'll match up when the boxes are nested inside each other.
Step Three: Add Insulation
Starting with the outer box, line the bottom with newspaper. Believe it or not, newspaper is actually a pretty decent insulator.

Then put a layer of straw at the bottom. Straw is also a very good insulator. I got a small bale for $3 at Michael's craft store. If you live in the country, though, I'm sure you can beg some off your neighbors. If not, you can find some at pet stores. Sawdust will work, too.
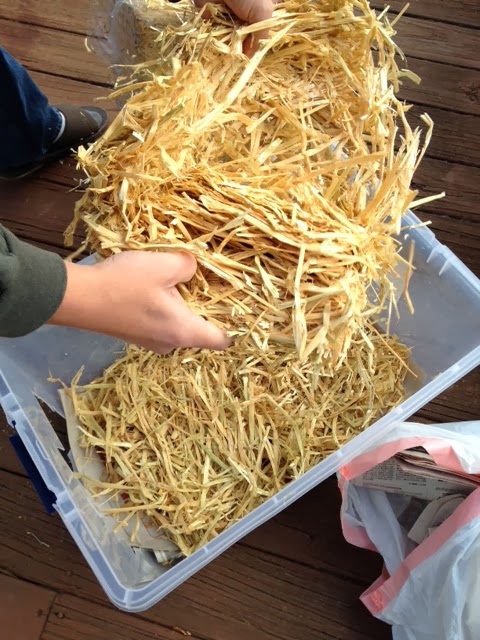
Place the smaller bin inside the larger, with the holes aligned. Line the bottom with straw...


Stuff as much straw between the sides of the two boxes as you can fit. Again, if you don't have straw, sawdust or even crumpled newspaper will do for this step.


Admire your finished box! I know the edges look a little jagged around the hole, but kitty's smart enough not to hurt herself on them. If you're worried, though, you can file them, or put a little duct tape over the points. We also added a belt of duct tape, as the box is stuffed pretty tight, and we don't want the lid popping off.

Place the box near the area where your stray has been taking shelter, but don't block her out of her current hiding place or try to force her into the box. We want kitty to feel safe and comfortable, and not frighten her away into an unsafe environment. This is her, by the way. She's cute, right? Right?You want her? ;-)

This box cost $20 and took us about twenty minutes to make. It's a small investment of time and money that could save an animal's life, so please, bookmark this post, so if you do find yourself adopted by a stray, you'll have these instructions handy. Thanks for reading!
Like me on Facebook, follow me on Tumblr, add me on Goodreads, and stalk me on Twitter!
No comments:
Post a Comment